Baby Booties and Hat Knitting Kits Knitting Yarn Kits Baby Booties and Hat
Free Crochet Baby Chapeau Pattern- makes the squishiest hat e'er.

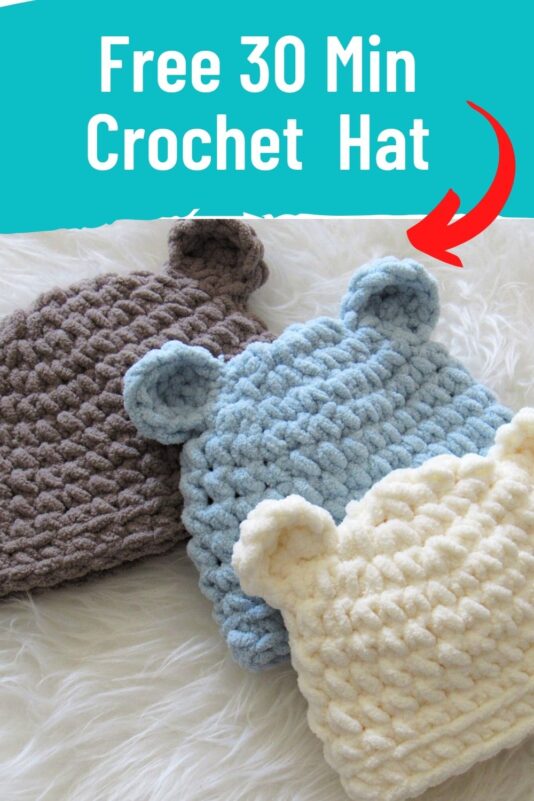
Crochet baby hats are one of the cutest items you lot can brand equally baby shower gifts or as photo props. These hats are elementary to make and volition look adorable on your little i.

The pattern is beginner friendly and uses merely bones stitches. The yarn and the ears add all the needed cuteness to the design. Don't you agree?

Do yous have some leftover Bernat Blanket yarn lying effectually? Utilise them up and turn them into these adorable infant crochet hats with ears. You can employ any other super beefy yarn also.

While at that place is an overload of cute crochet designs for infant girls, ones for infant boys are hard to find. I promise this design will make an interesting addition to your baby male child design collection.

If you are someone who loves making hats for hospitals, these 30 Minute crochet infant hats will be a great fit. It takes very fiddling yarn and you tin can make multiple hats in a unmarried 24-hour interval.
Crochet Baby Hat
You can piece of work from the free design beneath or purchase an ad-complimentary PDF for $3.99 here. You lot will receive a download link once you make payment and click "Return to Merchant".
Pin it for afterward here.
Materials
1. Bernat Baby Blanket yarn in any colour of your option. Colors Lemon Lime, Clouded, Infant Sand, and Vanilla were used for the crochet baby hats pictured. You tin substitute information technology with any super chunky, size 6 yarn of the same gauge.
2. A size N/P(10mm) crochet hook.
3. Tapestry needle to weave in the ends. You can likewise use a smaller hook.
Finished Size of Babe Crochet Hats
| Size | Circumference (inches) | Pinnacle (inches) |
| Newborn | xiii″ | 5″ |
| 0-3 Months | fourteen″ | 5-ane/2″ |
| 3-six Months | 15″ | half dozen″ |
| 6-12 Months | 17″ | half-dozen-ane/ii″ |
Yardage
xxx to 45 yards depending on the size you are making.
Run up Abbreviations
ch– chain
sc– unmarried crochet
hdc– half double crochet
BLO– dorsum loop only
Gauge
To measure gauge, work the showtime 3 rounds of the Newborn Crochet Hat.
The diameter of the circle subsequently iii Rounds= 4-ane/2 inches
Stitch Explanations
Back Loop Just(BLO): Piece of work in the BLO(Dorsum Loop simply) means you should work your stitch inserting your hook simply nether the back loop of the st and exit the front loop costless. Encounter picture below.

i. Insert hook under the dorsum loops only
More Crochet Infant Hat Patterns
Fall Beanie
How to Crochet a Beanie in 1.v Hours
Ribbed Crochet Lid Design
Infant Lid Crochet Design
Pattern Notes
ane. 2 options are given for Round 1 with or without a magic ring. Yous can choose whichever one you are comfortable with.
ii. If you offset with a magic ring, take special care to weave in the first tail securely going back and forth at least 3 times. Yous don't desire your magic ring to open up and make your lid fall autonomously.
three. If y'all work your beginning round without a magic ring, you lot might have to use the starting time tail to close any holes left on the crown before weaving in the rest of the tail.
4. First 3 Rounds are mutual for all four sizes. Later working on those proceed to Round 4 for the size you are making.
Circular 1(with magic band): Make a magic ring and piece of work 8 sc into it, shut the ring, do not sl st and exercise not turn.——–8 sc

2. In Round 1 without a magic ring you work around the chain
Round 1(without magic ring): Ch iii, 2 sc into 2d ch from hook, four sc into next ch, you will now end upwardly below your foundation chain, 2 sc into the side by side free loop of the foundation concatenation, practise not sl st and practise non turn. Encounter pic 2 above. ——–8 sc
Circular 2: 2 sc in next st( the showtime st of Round one), place a marker in the first st you just made, ii sc in side by side seven sts until you end in the st right before the marked one, do not sl st and practise non turn.——16 sc
Round three: 1 sc in next marked st, move the marker upwardly into the first st y'all but made, 2 sc in next *(1 sc in next st, 2 sc in next), echo from * until yous finish in the st right before the marked 1, do not sl st and do not turn.———24 sc
Newborn Crochet Hat
Circular 4: ane sc in next marked st, move the marker up into the st y'all merely made, i sc in each st across until you terminate in the st right earlier the marked 1, practise not sl st and do not turn.———24 sc
Repeat Round iv three more than times until your lid is 4-1/ii inches alpine. Do not spike off still. Fold your hat flat. I constitute that it lays flat in some directions more than the others. Experiment to find the best fold, then it becomes easy to attach the ears.

three. Piece of work sc sts until you reach the side of the lid and sl st to the side.
Once yous fold the chapeau, most probable your marker won't be on the side fold. So, accept out the marking and continue working sc sts until y'all reach most the side of the chapeau. It might take you one or more stitches depending on how you folded information technology and the size you are making.
Last Circular: Sl st to the BLO of the adjacent st on the side fold, ch 1, i sc in BLO of the same st as ch 1, one sc in the BLO of each st across to end, Sl st to the first sc. Fasten off.—-24 sc
Ears (make two)

4. Run the needle along the base of the ear and cinch.

five. Completed ear is round and bowl similar
Row ane: Ch 3, two sc in 2nd ch from hook, 2 sc in side by side ch, plough—–iv sc
Row 2: Ch 1, 2 sc in same st as ch 1, 2 sc in remaining 3 sts, fasten off with a 15-inch tail for sewing.—–eight sc
Attaching the Ears
Thread the long tail left on the ears and run your needle in and out through the straight base of the ear, pull to cinch. The tighter you pull, the smaller your ears volition look. Repeat with the other ear.
Place both the ears forth the sides of the chapeau and find the position you like best. Stitch them along the fold of the chapeau on either side.
Finishing the Newborn Crochet Hat
Brand sure you read the pattern notes give at the beginning of the pattern and and so weave in any tails left.
Free Crochet Baby Chapeau Design, 0-3 Months
Round 4: i sc in side by side marked st, move the mark upwards into the st yous just made, 2 sc in next st, 1 sc in adjacent xi sts, 2 sc in adjacent, ane sc in each st across until y'all end in the st right before the marked one, practise not sl st and do not plough.——-26 sc
Round 5: 1 sc in marked st, move the marking up into the st you lot just made, ane sc in each st across until yous end in the st right before the marked 1, practice non sl st and practice non turn.———26 sc
Echo Circular 5 iii more times until your hat is v inches long. Do non fasten off yet. Fold your hat apartment. When I tried to fold the chapeau with the marker on the side, it wouldn't lay flat. Experiment to find the all-time fold, so information technology becomes piece of cake to adhere your ears later.
In one case you lot fold the hat, most likely your marker won't be on the side fold. Then, take out the marker and continue working sc sts until you attain well-nigh the side of the hat. It might take yous one or more stitches depending on how you folded information technology. Please see picture 3 above given under the Newborn size crochet hat.
Last Circular: Sl st to the BLO of the next st on the side fold, ch ane, ane sc in BLO of the same st as ch one, 1 sc in the BLO of each st across to end, sl st to the starting time sc. Fasten off.—–26 sc
Ears (make 2)
Row 1: Ch 3, 2 sc in 2nd ch from claw, two sc in next ch, plough—–4 sc
Row 2: Ch 1, 2 sc in same st every bit ch i, 2 sc in remaining 3 sts, fasten off with a 15-inch tail for sewing.—-8 sc
Run across pics 4 & five in a higher place given under the Newborn crochet hat.
Attaching the Ears
Thread the long tail left on the ears and run your needle in and out through the directly base of the ear, pull to cinch. The tighter you pull, the smaller your ears volition look. Repeat with the other ear.
Place both the ears along the sides of the hat and find the position you lot like all-time. Sew them along the fold of the hat on either side.
Finishing
Make certain you read the design notes requite at the offset of the blueprint and so weave in any tails left.
Free Crochet Baby Lid Pattern, three-half dozen Months
Round four: 1 sc in next marked st, motion the marker up into the st you but made, two sc in adjacent st, *(1 sc in next five sts, 2 sc in side by side st), repeat from * 2 more times, 1 sc in terminal iv sts, do not sl st and do not plow.——-28 sc
Circular 5: ane sc in marked st, move the marker upwards into the st you just fabricated, 1 sc in each st across until you end in the st right before the marked 1, exercise not sl st and practise not turn.———28 sc
Repeat Round 5 4 more times until your hat is 5-1/2 inches alpine. Do not fasten off yet. Fold your hat flat. When I tried to fold the hat with the marker on the side, it wouldn't lay flat. Experiment to find the best fold, and so it becomes piece of cake to attach the ears later.
Once y'all fold the hat, most likely your marker won't be on the side fold. So, take out the marking and go along working sc sts until y'all reach near the side of the hat. It might take you one or more stitches depending on how you lot folded it. Please see pic 3 above given nether the Newborn size.
Terminal Round: Sl st to the BLO of the next st on the side fold, ch 1, i sc in BLO of the aforementioned st as ch 1, ane sc in the BLO of each st across to end, Sl st to the first sc. Fasten off.—–28 sc
Ears (make 2)
Row 1: Ch 3, 2 sc in 2nd ch from hook, ii sc in next ch, turn—–4 sc
Row two: Ch 1, 2 sc in same st every bit ch 1, 2 sc in remaining 3 sts, fasten off with a xv-inch tail for sewing.—–8sc
See pics iv & five to a higher place given under the Newborn crochet lid.
Attaching the Ears
Thread the long tail left on the ears and run your needle in and out through the directly base of operations of the ear, pull to cinch. The tighter yous pull, the smaller your ears will look. Repeat with the other ear.
Identify both the ears along the sides of the hat and discover the position you similar all-time. Sew them along the fold of the hat on either side.
Finishing
Make sure you lot read the pattern notes give at the get-go of the pattern and so weave in any tails left.
6-12 Months Crochet Baby Hat with Ears
Round 4: ane sc in next marked st, move the marker up into the st yous just made, 1 sc in next st, ii sc in next st, *(1 sc in adjacent 2 sts, 2 sc in adjacent st), *repeat from * until you end in the st right before the marked one, do not sl st and practice not turn.——-32 sc
Round 5: 1 sc in marked st, motion the marking up into the st you merely made, ane sc in each st across until yous end in the st right before the marked one, do not sl st and do non plow.———32 sc
Repeat Round 5 5 more times until your lid is 6 inches tall. Do not fasten off yet. Fold your hat flat. When I tried to fold the lid with the marking on the side, it wouldn't lay flat. Experiment to find the all-time fold, so it becomes easy to adhere the ears afterward.
Once you fold the lid, near probable your mark won't be on the side fold. So, have out the marker and continue working sc sts until you reach near the side of the hat. It might take you lot one or more stitches depending on how you folded information technology. Please see pic 3 above given under the Newborn size.
Last Round: Sl st to the BLO of the next st on the side fold, ch 1, 1 sc in BLO of the same st equally ch one, one sc in the BLO of each st across to finish, Sl st to the first sc. Fasten off.—–32 sc
Ears (make 2)
Row i: Ch iii, 2 sc in 2d ch from claw, 2 sc in side by side ch, plow—–4 sc
Row 2: Ch 1, ii sc in same st as ch 1, 2 hdc in adjacent 2 sts, 2 sc in terminal st, fasten off with a 15-inch tail for sewing.
See pics 4 & 5 above given under the Newborn crochet hat.
Attaching the Ears
Thread the long tail left on the ears and run your needle in and out through the straight base of the ear, pull to cinch. The tighter y'all pull, the smaller your ears volition await. Repeat with the other ear.
Place both the ears along the sides of the hat and find the position you like all-time. Sew them along the fold of the lid on either side.
Finishing
Brand sure you read the pattern notes give at the start of the pattern and then weave in any tails left.
Final Thoughts on Easy Baby Crochet Hats
I promise you lot would have enjoyed learning how to crochet a baby chapeau in just 20 to 30 minutes. If you don't want to use Bernat Blanket yarn you can also use any other super bulky, size six yarn. Have fun making these crochet hats for your baby!
Related Crochet Infant Hat Patterns
Crochet Beanie in 1.5 Hours
Crochet Ribbed Hat
Autumn Beanie
Pin information technology for afterward:
Crochet Baby Chapeau, Teddy Hats in 4 Sizes
Source: https://crochetdreamz.com/crochet-baby-hat/
Post a Comment for "Baby Booties and Hat Knitting Kits Knitting Yarn Kits Baby Booties and Hat"